
Postproduction Tips and Techniques for Underwater Photographers

Erin QuigleyMake your underwater photos shine with a few easy — and essential — postproduction tips
You’ve bought a new underwater camera system, but your images look like they were taken with a toy instead of the expensive rig in which you’ve invested. You’re frustrated, but don’t blame the camera. If you want your images to shine, you have to embrace post-processing as a critical part of your workflow.
Mastering just a few techniques can make an enormous difference in your photos. Though there’s plenty of post-processing information available for topside shooters, it’s not easy to find underwater-specific solutions. Lightroom, Photoshop and ACR (Adobe Camera Raw) can be used to address some of the most commonly asked questions about editing underwater pictures.
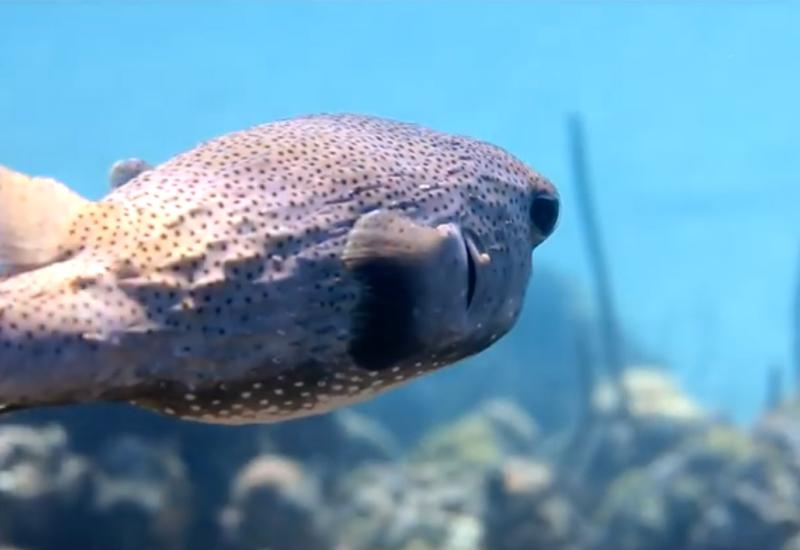
Q: Help! Everything in my underwater photos is blue. What can I do to fix this in postproduction?
A: There are many ways to deal with color casts, but a good place to start is by setting the white balance in the Basic panel. The White Balance tool consists of three components — the White Balance Selector eyedropper, a Temp (blue to yellow) slider, and a Tint (green to magenta) slider.
Click the eyedropper out of its dock and roll it into the image. Click on something that should be neutral but isn’t. You’re not necessarily looking for white. Good neutral examples are sand, non-specular (non-reflective) highlights or gray scuba tanks. Don’t expect to nail the white balance with the eyedropper alone. Just use it to get in the ballpark.
Finesse the results with the Temp and Tint sliders. Blue and yellow neutralize each other, as do magenta and green.
Toggle a before and after version of your image frequently as you work. In Lightroom, tap “\” (backslash); in ACR, hit “P.”

Erin QuigleyTry black-and-white conversion if an image is not reliant on color for impact and has strong elements of form or texture.
Q: How do I eliminate backscatter from my photos in post?
A: I wish I had a magic bullet for backscatter removal, but the truth of the matter is that to get spots out of your shots, you’ve got to master more than one technique. In Lightroom and ACR, you’re limited to a single Spot Removal tool. You simply draw over the piece of goo you want to get rid of, and the Spot Removal tool automatically selects another area in the image to heal from. If you don’t like the result, you can choose a different sampling area yourself.
Although it’s possible to do significant cleaning with the Spot Removal tool, it can be grueling — both for you and your computer’s processor.
For tough jobs, Photoshop offers myriad tools and techniques. You’re limited only by the depth of your bag of tricks and how much time you’re willing to spend on an image. A typical workflow combines the spot healing brush, healing brush, patch and stamp tool to get the job done.
Q: What is the best software for editing?
A: It depends on what kind of photographer you are. Lightroom and Photoshop are hands-down the best editing software for serious photographers. Adobe’s Creative Cloud Photography Plan combines continually updated versions of Lightroom CC and Photoshop CC, with a handful of enticing extras for about the same price as a Netflix subscription: $9.99 a month. For professional results, it’s the way to go.
For the hobbyist, simpler solutions like Vivid-Pix are easy to learn but offer limited control. If you’re someone who doesn’t want to commit the time required to learn pro software, one of these more-basic programs might be the right option for you.
Q: How can I enhance the colors on my reef and wreck photos?
A: The Hue Saturation and Luminance (HSL) panel is Mission Control for color enhancement. Hue is native color, Saturation is the vividness of the color, and Luminance is the lightness or darkness of the color.
Red, orange, yellow, green, aqua, blue, purple and magenta can each be adjusted individually in the HSL panel. For a quick overall pop of color, use the Vibrance (not Saturation) slider in the Basic panel, but don’t get carried away. Too much saturation looks hokey.
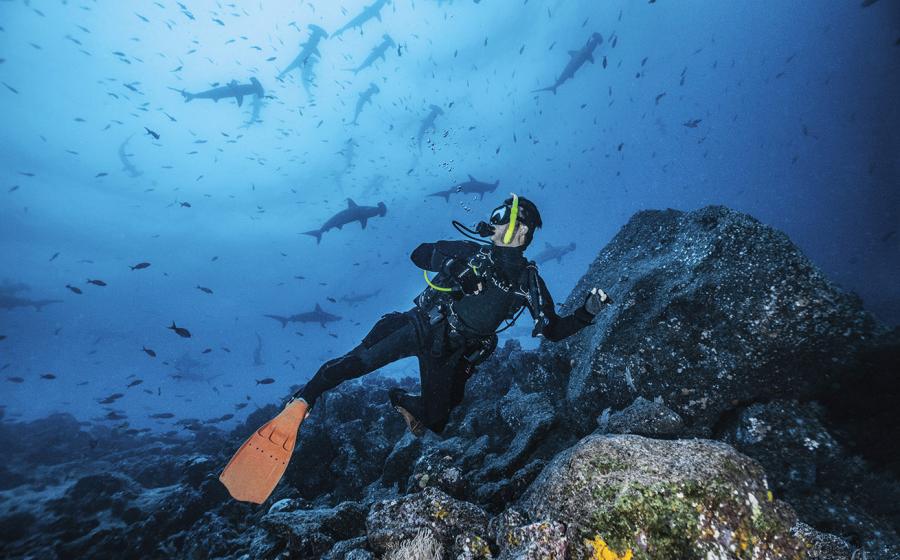
Q: When is it a good idea to convert an image from color to black-and-white, and what’s the best way to do it?
A: Any time an image is not reliant on color for impact and has strong elements of form or texture, black-and-white conversion is worth a shot. Wrecks, sharks, mantas, whales and any kind of silhouette are good subjects for this technique.
No matter which method of black-and-white conversion you use, it is important to have clean black and real white somewhere in your photo. Set a black-and-white point by using the Blacks and Whites sliders in the Basic panel.
In Lightroom, convert to black-and-white by clicking on the Black-and-White tab in the Basic panel or HSL. In ACR, click on the Convert to Grayscale checkbox at the top of the HSL panel.
Holding down OPT (Mac) or ALT (PC) while adjusting the Whites and Blacks sliders reveals a clipping preview. Adjust until you see the teensiest bit of clipping in each preview to set a black-and-white point.
Continue finessing your results, using the Black-and- White panel of HSL, or in the Tone Curve panel. Add polish with Adjustment Brushes and Filters.

Erin QuigleySetting the white balance is a good way to start adjusting for color in underwater photos.
Q: What is a good post-process photo workflow?
A: The most critical part of a good workflow is creating and maintaining an organized photo library. Image processing is fun, but if you can’t find your pictures, it’s all for naught.
Build a folder structure that works for you, and stick with it. Know exactly where all your images are.
Immediately after importing your images, make a quick first pass to cull the clunkers and identify selects.
Use Stars, Flags, Keywords and Collections to further rate and organize.
Make global adjustments, including Camera Calibration, Basic panel adjustments, HSL color tweaks, sharpening and cropping.
Make targeted adjustments with local tools. Adjustment Brushes, Radial and Graduated Filters work selectively on the image.
Make a “round trip” to Photoshop if needed. A round trip is when you want to move from Lightroom to do some postproduction work in Photoshop — for example, working in layers — and then returning to Lightroom.
Export to print, or share to social media.
Back up your image library and Lightroom catalog.
For step-by-step video tutorials on many of the postproduction topics discussed and more, visit Quigley's website.
GO-TO PHOTOSHOP TOOLS
The Spot Healing brush is the easiest to use. Simply click on an area to be repaired, and it automatically samples pixels near the edges of the brush for blending. If you find you’re getting blurred results, switch to the regular Healing brush, which does a better job of matching texture.
To use the Healing brush, first Option- or Alt-click on a source area, then paint over the pixels to be repaired. The Healing brush matches texture, lighting, transparency and shading, but doesn’t pay much attention to color. Use this brush to match texture and when you need more precision to line up edges.
The Patch tool lets you repair larger areas with pixels from another area of the same size. Draw around an area you want to repair. Click with the Patch tool inside the selection, and drag it to a clean area. When you release the mouse, the original pixels will be patched with clean ones from the sampled area. The Patch tool works well to speed up spot removal when you’ve cleaned up a decent amount of backscatter elsewhere, and can use the entire cleaned-up area to patch from. Use the Patch Tool in Content Aware mode to enable Structure and Color sliders in the Patch tool options bar, which can be used to fine-tune results immediately after the patch is complete.
The Clone Stamp identically copies pixels from one place to another. Option- or Alt-click to sample an area that you want to clone. Move the Stamp tool to the area to be repaired and paint. I resort to the Clone Stamp when I’m not getting any love from the Healing brushes.

Adobe Camera RawHSL panel in Camera Raw
BEYOND THE BASICS
Use the Camera Calibration panel to emulate your camera’s internal picture styles. I usually do this as the first step in my editing process. Browse through the profiles menu until you find one that makes your photo look best. Profiles differ depending on which camera you shot the image with, and this works only with RAW files.
Knock back unwanted cyan (ambient) light using HSL. Slide the Aqua Hue slider to the right, and the Aqua Saturation slider to the left. Moving the Aqua Luminance slider to the right will enhance dappled light on sharks, dolphins, turtles, and the surface of the water.
Learn keyboard shortcuts now! Don’t wait until you think you’re good enough to use them. Learning the shortcuts is how you get good.
If you’re not getting enough juice from the White Balance tool in Lightroom or ACR, open the image as a Smart Object in Photoshop, and apply a Camera Raw Smart Filter. You get a whole new zeroed-out set of white balance sliders to supercharge your adjustment.
Make Content Aware Fill (in Photoshop) accurate by temporarily masking out pixels you don’t want used in the fill. Add a layer mask, and paint with black over unsuitable areas. When you’re done with the fill, delete the layer mask.
Erin Quigley is an Adobe ACE-certified digital-imaging consultant specializing in customized workflows and editing strategies using Photoshop and Lightroom. She is an award-winning photographer and regular contributor to Scuba Diving magazine.