
Underwater Photo Tips: Taking Pictures of People

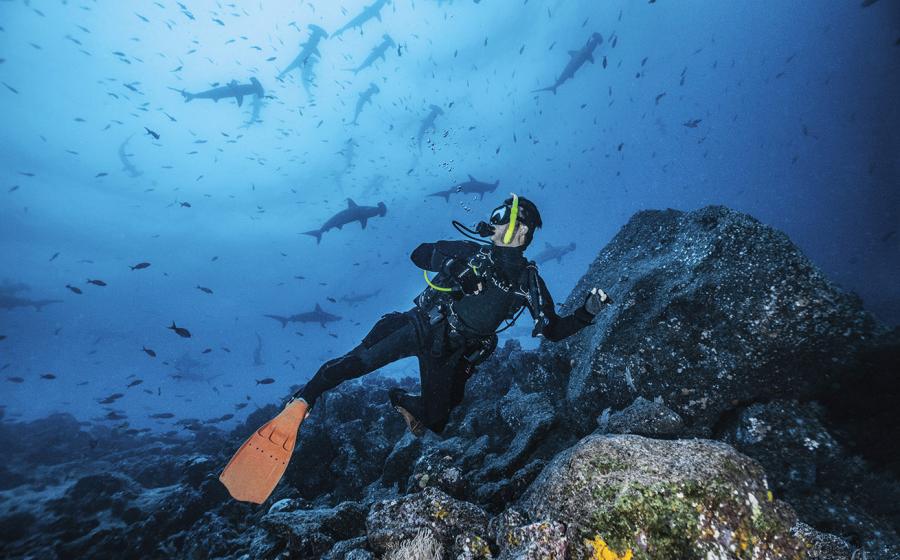
Alex MustardCAMERA Nikon D4, Subal housing // LENS Sigma 15mm fisheye // STROBES Inon Z240 on camera, Nikonos SB-104 off camera // SETTINGS f/13, 1/20 sec, ISO 800 // LOCATION Alghero, Sardinia, Italy
A diver (Laura Morcillo) explores inside the Arches (Nereo Archi) of Nereo's Cave (Grotta Di Nereo).

Alex MustardCAMERA Nikon D4, Subal housing // LENS Nikon 16mm fisheye // STROBES No strobes, Magic Filter // SETTINGS f/11, 1/80 sec, ISO 250 // LOCATION Kittiwake wreck, Grand Cayman
A snorkeller (Mark Tilley) explores the wreck of the USS Kittiwake using a scooter.

Alex MustardCAMERA Nikon D4, Subal housing // LENS Nikon 16mm fisheye // STROBES Seacam 150 strobes // SETTINGS f/16, 1/320 sec, ISO 320 // LOCATION Misool, Raja Ampat, Indonesia
A large red seafan (Melithaea sp.) dwarfs a diver swimming above.
Photographs of marine life are always good, but sometimes it’s those hard-to-get “people shots” that truly tell the story.
Few underwater photographers start out wanting to photograph people. Our first shots are usually to record all the fish and marine life that got us diving in the first place. We might take the occasional snaps of our buddies, but new photographers are rarely motivated to take people pics.
That all changes when you start showing your images, wanting to tell stories with them, and trying to get them published. In these cases, people shots are invaluable. In short, if you want your photos to sell, the most important subject that you can point your camera toward is another diver.
Magazines love people pictures because a model adds human interest, helps tell a story and endows an image with the sense of “that could be me.” Pho- tographically, a model provides a sense of scale, which can balance a wide-angle composition, creating a point of interest in otherwise open water, and by looking at the main subject of the photo, can reinforce the viewer’s interest, helping your composition work.
In theory, people should be one of the easiest underwater subjects. They are big, won’t run away and will even pose on demand. However, there are a few small details to help ensure that your model shots stand out.
Model Behavior
The first challenge of people photography is finding someone willing to pose. Distant compositions can be made with passing divers, also known as models of opportunity, but most people pictures require planned posing. Many photog- raphers dive together and take turns modeling for each other.
The best divers are usually the best models, because they look the most relaxed in the water and can most easily hold an elegant pose. Dive guides are ideal, but their time is not only yours, and they will have more-important responsibilities to tend to.
I often ask staff on their days off, who will usually be happy to have some photos to share with their family and friends. (It doesn’t hurt that they are usually better proportioned than your average vacationer — or underwater photographer for that matter!)
People work best in underwater pictures when they are either near or far. Middle distance is rarely effective because the model is too far away to be lit effectively and still too large in the frame to balance the composition in the way that a distant silhouette does.
Keep Your Distance
Before diving, I discuss my plans and show the models how wide a view my fisheye lens sees, so they understand how they will appear. When working with new models, I’ll start off framing them as a silhouette, which makes them less self-conscious and more relaxed. And since their eyes are not visible, they can look right at me and judge their position from the reflection in my dome port. As a silhouette, the diver’s shape is critical to an engaging composition. Even small in the frame and clad in neoprene, viewers will still pick up on body language.
The best pose might take a few shots to perfect, so make sure you’ve got the rest of the picture right before calling in a model. It is also easier for a model to swim than to hover, so advise your model to fin across your picture, parallel to the camera. If he swims straight at you, his silhouette will be a messy blob. What also looks bad: perfect tec-diver trim, with knees bent up, frog kicks and hands thrust out in front. Neat arms and long, straight legs look much more elegant — better still if one leg is slightly bent, so the diver looks like he is swimming.
Look in the Eye
When a diver is close and lit well, his eyes will dominate the composition. Glance across the page, and you’ll find that the model’s eyes grab your attention, despite being small. Getting the eyes right becomes critical to the success or failure of the image.
Lighting a diver’s eyes is much easier with a clear-skirted mask because clear silicone lets in the light from your strobes, while a black-skirted mask is more likely to cast shadows. Most flattering is a 1960s oval mask, which shows the entire face. But, of course, nobody uses these masks anymore, and many editors will instantly reject your photos as dated.
The best directions to give a model are to face toward the camera but not to look straight into the lens in a “Hi, Mom!” pose. If there is subject matter between you and the model, you can direct the model to look at that subject. If not, ask him to look at your hand, and hold it above and slightly to the side of the camera. But the best advice is to always be patient and encouraging. Modeling is much harder than it looks, so always be grateful to anyone willing to give his or her dive time for your photos.
Pro Tip
A wide-angle lens is a necessity when photographing people, but these types of lenses tend to distort the scene, especially fisheye lenses. Unlike distorted fish photos, photos of misshapen divers can be distracting. Try to avoid placing people close to the corners or edges of the frame so that there are no unwanted bulges. If necessary, use processing software to correct any fisheye distortion.
For more tips on underwater photography, visit sportdiver.com/photos.